

Published Articles
Why vets we meet choose DR over CR for their dental radiographs
Article from Veterinary Practice, 01 july 2017
RAINE LEARY of Clark Dental explains why you are working blind if you don’t take quality digital radiographs of your patients
OVER MANY YEARS OF OFFERING both CR and DR in veterinary dental treatment, the vets we are associated with invariably choose the DR dental radiography system. We visit, demonstrate and train with both DR and CR systems on live animals in dental procedures and have found it is very rare for a vet to prefer the CR system. Why is this? Admittedly the financial outlay is somewhat higher with some manufacturers of CR, but we believe it is the speed of the DR system. Looking at the workflow, the CR system has approximately 10 steps and can take up to 20 minutes. The DR system has approximately seven steps and in experienced hands a total examination can be completed in just three to five minutes. With a CR dental system, the process is as follows:
-
Prepare the flexible imaging plates by placing each plate in a single-use clear sleeve.
-
Place the first plate in the animal’s mouth and set up the dental x-ray generator using a bisecting angle technique where required.
-
Fire the dental x-ray generator.
-
Repeat the process as many times as required to cover the maxilla and mandible.
-
Tear each sleeve to release the imaging plate, being careful not to allow strong light onto the plate as this would affect the image.
-
Be careful that you are not allowing blood/fur/dust to enter the CR scanner. Unlike large CR scanners for general full body radiography, dental plates are removed from their protective covering. Make sure you have plenty of gloves and wipes to hand.
-
Feed each plate into the scanner one by one. Each one will take 20 to 32 seconds before the image appears on screen, depending on resolution. So several plates could take several minutes just to feed plates through and see on the monitor. This time does not include the time taken to position and take the images.
-
If your angles are incorrect and you did not capture the area of interest, it is difficult to ascertain where the plate was in the animal’s mouth – in which case another attempt is necessary.
-
The plates must be clean, ready to use for the next animal and you must make sure you have plenty of consumable sleeves. Be careful when handling the plates as they can scratch and will deteriorate over time (from our experience, approximately a year).
-
Some vets like the idea that plates are flexible, but bent plates mean distorted images and all manufacturers have “do not bend” warnings in their literature. The DR dental system process is far simpler:
-
Place the DR sensor in a plastic sheath that you can use for as many images as you need to on that patient.
-
Position the animal in lateral recumbency. Radiograph the maxilla and mandible, then turn the patient to repeat the process on the other side.
-
Position your x-ray generator in a bisecting angle technique (this is simple and we can show you how) to take a view of the incisors and fire. Four seconds later, your image will be on the monitor with no manual processing required. The software does everything.
Just three minutes
By following the details listed above you can capture 10 images on a cat, for example, start to finish in three minutes. If you should miss the region you were trying to capture, the DR sensor is still in situ and the x-ray generator – whether wall-mounted, trolley or Nomad handheld – has not moved so you can adjust slightly and fire again. Because you are using a DR sensor, you will never see a scratch or “feathering” on the image as you will over time with CR plates. Once you see an image on the monitor, four seconds after firing, the sensor is immediately ready to take the next image. The particular DR system that we supply is the Fona Stellaris/Schick system. The sensor has two years’ warranty and is supplied with a spare, user-changeable sensor cable. The perception can be that DR is expensive if it fails, but actually the Fona/Schick system is extremely robust and you are unlikely to need to change a cable for many years; in any case, you have a spare cable supplied with the system and could buy another if ever required.
Full body CR scanners don’t work for dental
We are often called in by vet practices who have CR dental plates included with their general full body CR scanners and they tell us that because of the time wasted fiddling around with plates and
envelopes, the slow, laborious work flow and the frustration of retakes, these are rarely used and they are interested in dental DR – often having been recommended our Fona Stellaris/Schick system by colleagues who already use it.
DR is fast and convenient
Vets always comment on how quick and easy the DR system is to use and invariably that is what they purchase – even though we do also promote and demonstrate quality dental CR systems. If I was a vet, I would use CR for my large images and I would definitely use DR for my dental images. As the well-known Specialist Martha Cannon states: “I have a specialist cat clinic and although smaller sizes were available for purchase, I chose the Fona Stellaris/ Schick DR size 2 sensor, which is perfect for our dental radiographs. I have been using the system for three years and it is excellent for taking feline dental radiographs quickly, diagnosing effectively and communicating with owners.” Matthew Oxford of New Forest Veterinary Dental Service Ltd has been using the Fona Stellaris DR system for many years. “Image quality, speed and simplicity are important in my work and the Fona Stellaris/Schick system is superb in my opinion,” he says. “The software is simple to use and the support from Clark Dental has been excellent.”
The financials
A Clark Dental Veterinary imaging specialist can visit to demonstrate both DR and CR systems and then we install, train and support our customers. It is very simple for the equipment to pay for itself as customers typically charge between £50 and £70 for a set of dental radiographs. The Fona Stellaris/Schick dental DR system, purchased with the Nomad handheld x-ray – the perfect partner to get the dental angles that you need (as well as taking radiographs in theatre and more) – costs around £50 per week total on finance over five years, so you can see that one paying customer per week covers the cost of the equipment. Add an opt-out clause on the consent form and you will find the majority of owners accept the extra cost for radiographs as you explain to them that without quality digital dental radiographs you are, in effect, working blind.
The practical aspects of dental radiography
article from veterinary practice, 01 august 2017
MATTHEW OXFORD explains the differences between the two main types of dental x-ray systems and evaluates the two broad options for positioning for best results
DENTAL RADIOGRAPHY IS A GROWING FIELD in general veterinary practice, and rightly so. Dental radiography opens a huge volume of information that allows accurate decision making regarding disease processes and treatment options. For a long time, dental radiography was only used by those professionals who carried out advanced dental procedures. But now, in a straw poll of delegates attending various CPD events and lectures, my estimation is that perhaps a third of veterinary practices now have dental radiography. This article is going to look at some of the practical aspects of dental radiography, including different types of system that are available, and how best to get diagnostic images.
Dental radiography systems
As with standard x-ray systems, there are two broad categories of dental radiographic equipment for image capture. There are indirect (or CR) systems and direct (or DR) systems.
CR systems
CR systems can be further broken down into dental-specific systems (Figure 1) and systems used to adapt existing standard image capture cassettes (Figure 2; verleaf). These systems utilise digital phosphor films, which are exposed to x-rays while positioned within the mouth. The film is then removed from the mouth and placed within a processor which reads the film and produces an image on a computer screen. For each exposure, a barrier envelope is required to protect the film, which is then removed as the film is placed in the processor. For dentalspecific systems, films are processed individually. For the adaptor cassettes, several films are mounted within a standard CR cassette which can then be processed together. CR systems usually have more than one size of film, often with size 2 and size 4 films available. CR films have a lifespan of approximately one to two years depending on their use, as they will become scratched and will therefore need to be replaced.
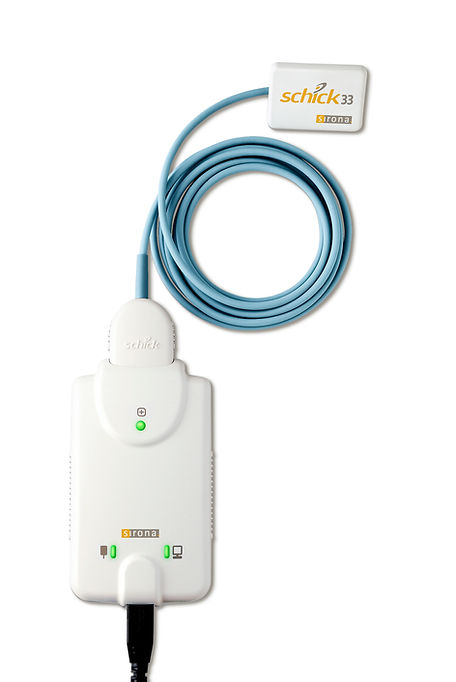
DR systems
DR systems utilise a digital sensor which is connected to the computer by a wire, usually to the USB port (Figure 3). The sensor is exposed to x-rays while positioned within the mouth. The sensor then processes the image, which will appear on the computer screen within a few seconds, without any need for further processing. A new barrier envelope is required for each patient. DR systems in general only have a single size 2 sensor available. DR sensors are very hard-wearing and will last many years. Their weak point is often the point where the cable attaches, which can often be replaced if damaged.
Image quality (Table 1)
For the most part, dental-specific systems, either CR or DR, have a very similar image quality. Image quality and resolution in dental radiography is measured in line pairs per mm (lp/ mm). The higher the number, the better the resolution. Most dental-specific systems have a resolution of over 25lp/mm.1,2 Some CR systems quote higher theoretical lp/mm resolutions, but this is achieved using single-use films. One must be very careful of some dental-specific
systems, as not all offer such a high resolution. Systems used to adapt existing standard CR x-ray do, however, often fall behind the dental-specific systems. Typical CR conversion systems have a
resolution of 5-8lp/mm, which is only 20-30% of the dental-specific systems. Reduced image resolution can make assessment of pathology difficult. In particular, assessment of tooth resorption in cats can be much more challenging, as the clearest image possible of the periodontal ligament space is required to be able to assess
external root resorption (Figure 4).
Flexibility
With their variety of film sizes, CR systems are more flexible than DR systems. Indeed, CR systems can be used outside of just dental
imaging and can be used in the radiography of distal limbs and for exotic animal work.
Ease of use
DR systems, in the author’s opinion, are far easier to use. In particular, they make it far easier to learn dental radiography techniques. As the DR sensor stays within the mouth for processing,
all the equipment (sensor and generator) stays in the same place between exposure and the image appearing. This is important, as especially when learning dental radiography positioning techniques, the position of either the sensor or the generator can be wrong. As the equipment doesn’t move, it is very simple to adjust the positioning to improve the image. With CR systems, as the film is removed from the patient’s mouth for processing each time, an additional variable is created. Therefore, the clinician must remember where the film was positioned if any adjustments need to be made to positioning. Secondly, the speed of image production is far faster with a DR system than with a CR system. There is always an element of time taken for film processing with a CR system that is not required for DR.
Positioning for dental radiography
There are again two broad options for learning how to position for dental radiography: either the clinician can position the patient according to a set of predetermined angles, or they can use a bisecting angle technique. Learning radiography from a set of predetermined angles may at first seem the most straightforward way of producing images. However, like many shortcut techniques, it has its limitations. As vets, we treat a vast number of dog breeds with a huge variation in their size and relative anatomy. Therefore, if we just try to use a set of predetermined angles, then we will soon find that many of our patients don’t fit those angles. If having taken the image the clinician isn’t happy with the result, unless they understand the principals of how the original angle was generated, there is little chance of being able to improve that image by repositioning. Sometimes this can be overcome by taking
an image of a full dental arcade. The drawback of this is that it goes against our need for dental radiography, whereby we are aiming to focus down on one or two teeth to avoid the problems
of superimposition and artefact from beam divergence. This is where the necessity to learn the bisecting angle technique becomes apparent. By learning this technique, the clinician can calculate the correct angle that the x-ray generator should be placed at by assessing the position of the film/sensor relative to the long access of the tooth. It can be used therefore for any tooth with any film/ sensor position. It is not a difficult technique to learn and once it is mastered, dental radiographic positioning becomes very straightforward. Numerous texts, articles and courses are available that cover the bisecting angle technique (Gorrel, 2004).
Full mouth radiography or not?
Full mouth radiography is mandatory for dental assessment in all cats undergoing dental treatment for the assessment of tooth resorption. This is incredibly common and the only way that pathology can be assessed and treatment options decided upon is by using dental radiography (Lommer and Verstraete, 2000). A large proportion of lesions cannot simply be assessed by oral examination
as the lesions cannot be seen in their full extent, and this will affect treatment decision-making. The situation in dogs is different. While much of the disease processes still affect the roots or their surrounding bone, there is often an indicator that pathology is present that can be assessed by dental examination under anaesthetic. The pathology still needs to be assessed radiographically to assess the most appropriate treatment option. It is therefore more commonplace to simply radiograph teeth identified as being affected by pathology to formulate a treatment plan.
Conclusion
This article has covered some of the more practical aspects of dental radiography posed to practices and clinicians. These are becoming more apparent as more and more practices look to invest in dental radiography systems.
References
-
Lommer, M. J. and Verstraete, F. J. M. (2000) Prevalence of odontoclastic resorption lesions and periapical radiographic lucencies in cats: 265 cases (1995-1998). Journal of the American Veterinary Medical Association 217 (12): 1,866-1,869.
-
Gorrel, C. (2004) Dental Radiography. In: Veterinary Dentistry for the General Practitioner; Elsevier; pp57-68.
.jpeg)
